This is a post I had previously published on Behance about creating a cycles water material in Blender, in August 15, 2014. I am republishing it here (because, why not do everything I can to drive traffic to my own site, rather than another?)
[02-08-17]: Not sure why I didn’t include the material. Here it is. Better Liquid Material – As always, be sure to scan the zip file before opening it. I do my best to screen everything and keep my site protected. However, there is always a risk with downloaded files.]
First, a quick note. For many of the examples I will show, I’ll be using a simple scene. The elements in the “base” scene will not change. The point of these elements is to make it easier to see some of the material aspects as I progress through this project. Here is the basic scene:
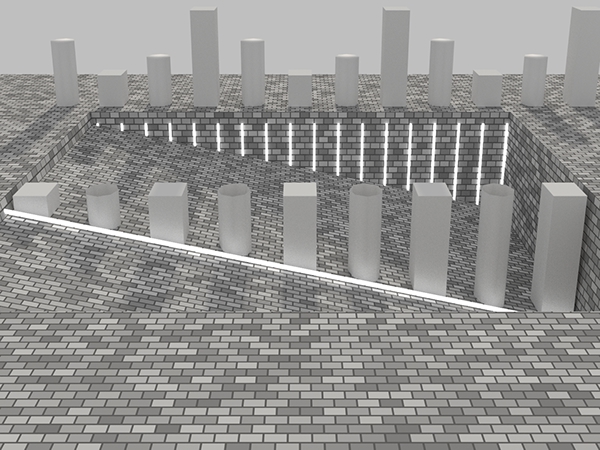
This is the basic scene I’ll be using to display the different materials later on.
I do not submit that this is the best method. I am quite confident that there are many people who are far more experienced in using Blender (or other rendering apps) that could come up with a better and/or more streamlined material. I only present this as my progress in creating a better water/liquid node for my uses. Since I have gained so much from the online community, I felt I owed it to others to share my little experiment, on the off chance that it may be useful to anyone else. Plus, by explaining what I have done helps me to understand it all better. So there you go.
—————–
Ok. Some time back, I wanted to create a water material in Blender. Specifically, I was going for a calm water effect. I began by trying to get the Ocean Modifier to work; however, that modifier is either not suited for calm water or I just have not really learned how to use it properly.
So, I worked out a way to create a calm water surface using texture nodes. As it turned out, the setup is very simple. You could even make it even more basic or more complicated by following this structure.
 Calm water displacement node
Having tackled that aspect (and feeling quite happy with myself about it), I then wanted a better water material. Sure, for many scenes, just using the Glass node will work very well.
 Using a Glass Node to make the water.
 This is the material for the prior scene. Note that this is the same Displacement setup as listed above.
I quickly found a problem, however. Let’s say you want the water to be cloudy. You just set the Glass Roughness to your desired amount. Right?
 Here, I set the Glass node’s Roughness to 0.05
Depending on your desired result, this may be way off. The issue is that the Glass Roughness causes a blur in the water refraction and the water reflection. While watching the pool guy add his chemicals to my the water one day, it occurred to me that this is not always what I would want. When he put in the chemicals, the water turned a bit cloudy, but the reflections on the water did not lose any clarity. I can think of many instances where this would be the case. Think water with something dissolved in it. Or milk. Or orange juice.
So, I split it up. One node for the water itself, a Refraction node, and one node for the reflection, a Glossy node. The result is this:

 This is the material.
Nothing comes without a price, though. This setup takes significantly longer to render than just using a Glass node. So, you wouldn’t want to do this if you only want clear water or you don’t mind that both the water and the reflections are blurred the same amount.
Next, there is the issue of the color change that often occurs when you have water, or any liquid, that reaches a certain depth. This one was a real bear and I had to resort to a bit of research to figure it out. To be more accurate, someone else had figured it out and I found his tutorial.
The tutorial is brilliant and I highly recommend it: http://blenderdiplom.com/en/tutorials/419-tutorial-absorption-in-cycles.html His process is fantastic, is surprisingly simple (the math isn’t the easiest to follow, but he does a nice job of simplifying it for you.
So, I incorporated his setup into my own and grouped it all together. This gives me my Water & Reflection Base node.
 I think the settings are fairly easy to follow.
Water Color is your base material color.
Depth Color is what you want the water to change to as it gets deeper.
Depth Strength allows you to increase/decrease the color change.
IOR means what it always means.
Water Blur is the Roughness of the Refraction node, changes the blur of the water, but not the reflections.
Reflection Color – because sometimes the reflection should not be the same color as the water.
Reflection Strength, just what it sounds like… the amount you want the reflections to cover the water itself.
Reflection Blur – the Roughness of the Glossy node, changes the blur of the reflections, but not the water.
Water & Reflection Normal – I can imagine that there may be some need to specify how colors are mapped, so this may be necessary.
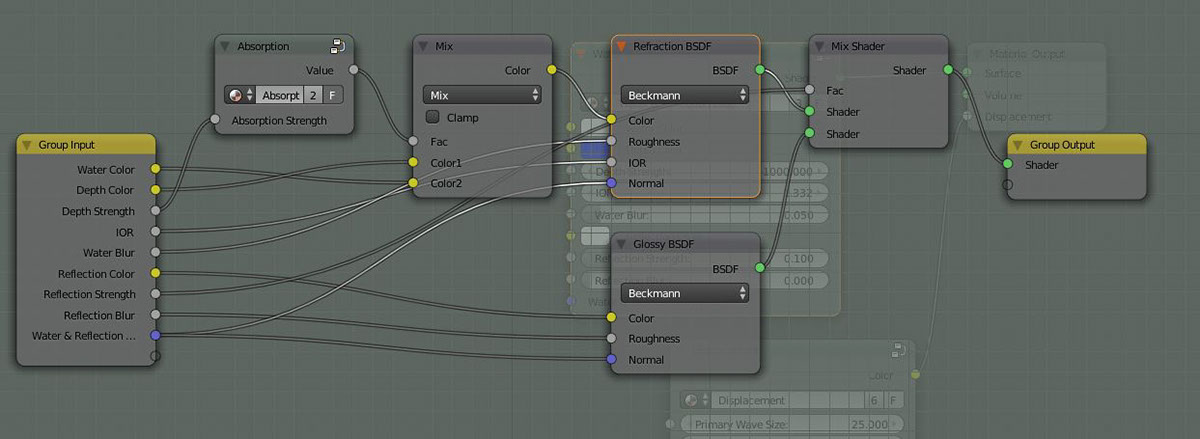 This is the setup for the Water & Reflection Base node. The Absorption node is what I got from the tutorial (link above).
That give us this result:

Great. But (there is always one big but, isn’t there?), the depth color isn’t doing much to the light tubes, is it? In fact, you could up the Depth Strength to 1000, resulting in deep blue water, but the light emitters still show as pure white. Yes, you could change the Water Color to a blue, and that will change the light in the water. However, it will change the light’s color, no matter the what water depth may be. That’s not right either.
When I *informally* began this experiment, there was not an option for volumetrics in Cycles. There were probably other things I could have tried, like the Subsurface Scattering node. However, up to this point, I could render this using GPU. So, now we have a couple of nice volumetric effects, but we have to switch back to rendering on the CPU – until volumetrics are made to be GPU compatible, anyway.
So, I started building a grouped Volumetrics node. Here is the setup:
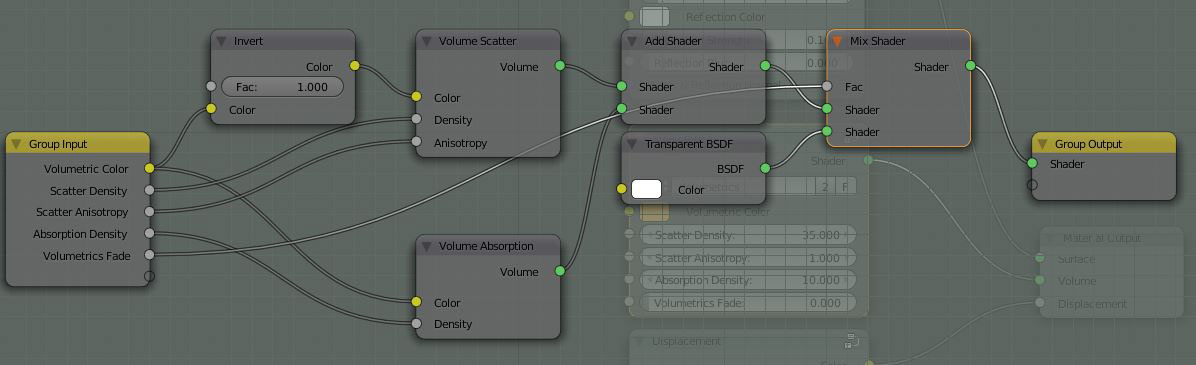
I cannot explain exactly how I came to this setup. It was a lot of trial and error, before I got it the way I wanted it. You may want something different. For example, I noticed that the color for the Volume Scatter results in a scattering color that is exactly inverted of whatever I put in. In other words, I put in a red color for Volume Scatter and I would get green water. I wanted the scatter color and the absorption color to be the same. I cannot tell you if that is realistic or not. It’s just what I wanted. Â So, I take the same color input for both the Scatter and Absorption nodes, and just invert it for the Scatter node.
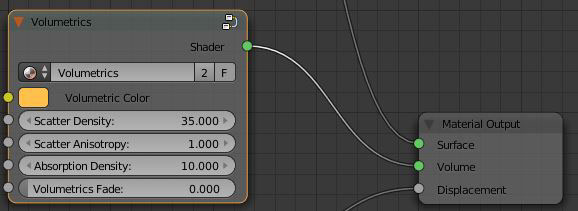 Volumetric Color – the color you want scattered/absorbed as the densities increase.
Scatter Density & Absorption Density – Just what they sound like. I felt a need to keep these as separate settings, for greater customization of materials.
Scatter Anisotropy – I’m not exactly sure how accurate my understanding is, so bear with me. I believe that this changes the direction of the scattering effect. A positive number directs the scatter towards the camera and a negative number directs the scatter away from the camera, while 0Â allows scattering in all directions. Playing with this, I usually opt for a value of 1.
Volumetrics Fade – just another setting for the sake of easier customization. 0 is full strength and 1 fades out the volumetric effect completely.
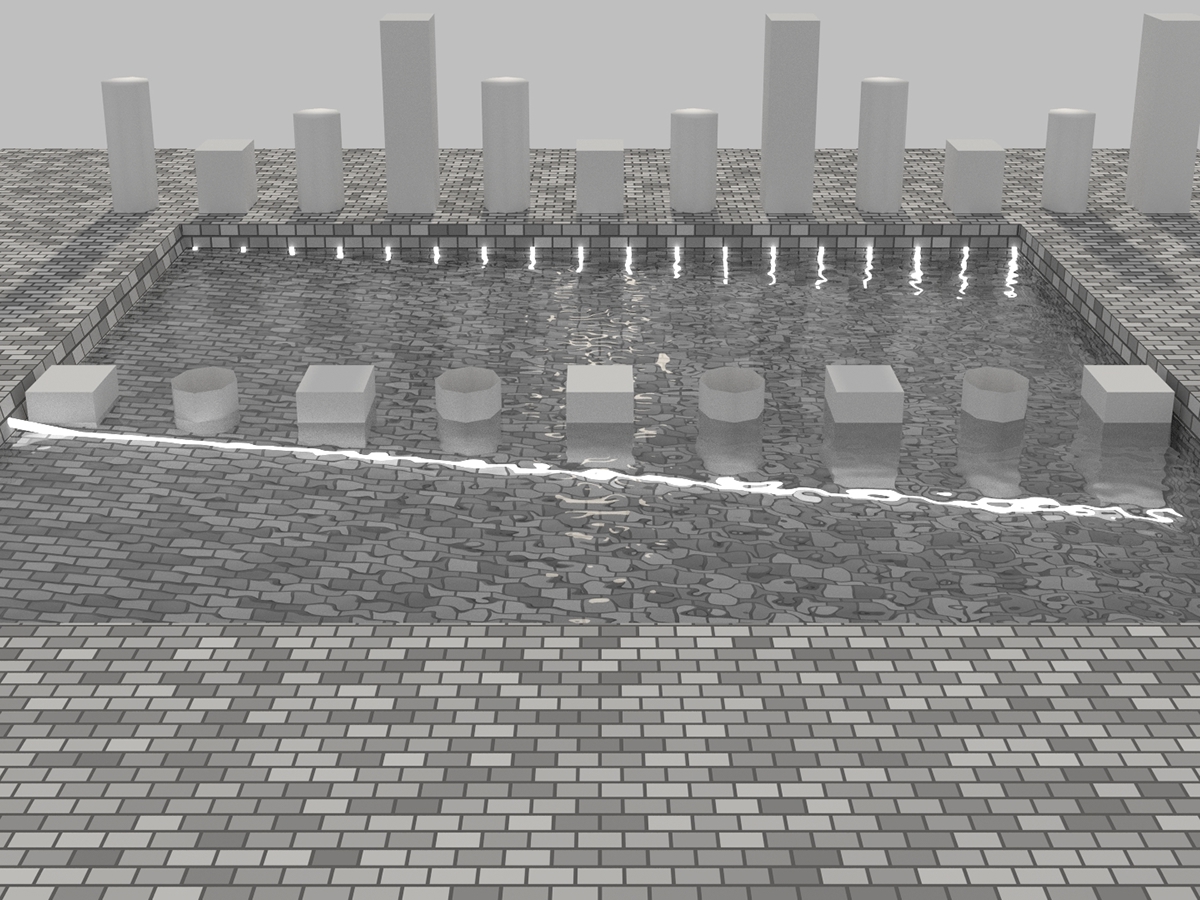
Ok. Adding that to our blue water example from above, we get this material:
 Yes, it is a bit bulky.
Which results in this render:

So much better!! The light turns more blue as the water gets deeper. Exactly what I was going for. However, with the volumetrics added, do we need the Water Depth settings from before? Changing the Water Color to white and the Depth Strength to 0 gives this result:

The difference is very slight. Without the Depth settings, the blue is slightly less intense. So, no. You don’t need both. However, I can imagine wanting to play with mixing three colors in one liquid (the base Water Color, the Depth Color and the Volumetric Color). However, in my initial tests, the Volumetric effects tend to over power the Depth effects. There *may* be a way to use both, but I am guessing that if you can do something using both settings, you can probably do it without the Depth settings and just the Volumetrics.
To test that out, as well as to put everything else together into one monster node (because why not?), here is an attempt at some murky, algae water. For the material, I grouped everything I have done so far – including the Material Output node.

Which results in this render:

And there you have it. Nasty water. As I said, this is just my little experiment. I may well have gone about it in the most difficult way possible. I certainly do not have the best solution, but it works for me – until I find or figure out a better way.
Suggestions for improvement are absolutely welcome. I am not used to sharing things like this, so bear with me while IÂ figure out how I am going to share the blend file. Stay tuned.
Thanks a lot! wonderful tutorial. 😀
Nice water material, is it available to download?
Sorry about that! I thought I had included it. I have added it to the top of the post.
PS: I didn’t clean up the blend file before zipping it up. The final material will be either the Pure Water or Nasty Water materials. Or, if you are going to import the material, just import the Liquids node group.
Thanks! Will check it out. I have a tricky challenge to make water going from clear to murky at the bottom while rising in a tank! Hoping this helps me figure it out. Must have made 20 water test scenes so far! PS. Notify did not work.
Forgive me if I’m wrong but the textures for the material does not seem to be packed into the .blend file
I’m an idiot, it just looked different from what if first expected it to. I guess
Lol. It could be me. I do not post things like that very often and I think I could have made it a little more obvious.
This is quite amazing! I’m starting to learn Blender and got a little lost. It works on your file but when I try to import the materials and apply them, it doesn’t work at all. Thanks for sharing anyway!
Thanks! It’s been a bit since I opened up Blender; but, I would start with checking that Blender is set to use the Cycles engine for rendering. It does not default to Cycles, unless you change the start settings. That would account for it working when you open my file but not when you import the material. Its something to check, anyway. A quick Google search can tell you exactly where to look (typically a dropdown box near the top center of the Blender window).
Thanks for the reply, Matt. The problem wasn’t that, I’m not that newbie. 🙂 I spent almost a hole day trying to make it work and couldn’t so I moved on. My water isn’t as awesome as yours but it works for what I want now. If you want to take a look: instagram.com/filgouvea
Hello! I’m following your tutorial on pool water. I can not find the node displacement (primary wave size and secondary wave size). Can you help me? I am using Blender 2.79. (Sorry my English – Google translate) I’m a Brazilian and old man. Hugs
The properties you mentioned are a part of my Liquid node – which is simply my grouped node. In the download file (see the link at the top of the post), you can find the material and the nodes are all in there. If I have misunderstood your question, just let me know.
Don’t worry about your English – I use Google Translate all the time. 🙂
Thank you very much!!! I am satisfied!!!
I learned so much about nodes I didn’t know before. Thank you SO much for including your blend file. Great tutorial.